Just noting when I installed a new battery in the CR-V. Duralast gold, 3 year warranty. Hopefully it lasts that long!
Hanover Homestead
Living "the good life" while working towards self-sufficiency on our 1/2 acre plot in small town New Hampshire.
Sunday, October 12, 2025
New Battery, CR-V
Thursday, August 21, 2025
Rear wheel bearings, and a new heater blower
Getting through perhaps the past state inspection- needed rear wheel bearings. Actually a pretty easy job in the end. Hardest part is getting the brake pads reinstalled correctly! Bonus, now have new hubs on the rear which will allow a new screw to secure the brake discs- no more having to mess around to align the lug-bolt holes
Bonus, the heater blower resistor-pack has been blowing fuese, which means the blower motor is dying and drawing too much current. Replaced that today as well.
Monday, October 28, 2024
Clutch hydraulic hose, CRV
Hose had gotten old and stated to weep. Very slowly but enough. Replaced and bled. No real issues and not particularly photogenic...
Saturday, January 21, 2023
Oil, filter change, Golf
nothing special here, just noting the change today, at 252,694 miles. Starting to wonder if the PCV valve might need changing...
Wednesday, September 1, 2021
Getting through inspections... Sway-bar end link on the honda, new brakes on the Golf, a CV boot, and some welding on the exhaust!
I didn't take too many pics of any of this work in part because of all of the great youtube videos and such out there- there are much better resources to find out how to do these things! But this year to get through inspection I had to:
On the Honda- broken sway-bar end link in the rear. Had to chop the rusty bolts off since they were just spinning in the ball joints but otherwise an unremarkable job.
On the Golf: I knew I needed e-brake cables (those cables have been bad/binding for years but I've just struggled along with it) before the inspection. So I did those, and then literally on the way to the inspection the ABS light went on. Vag-Com tells me it's likely a bad sensor on the right rear.
Ok. So wait a few days for mail-order parts and then dive into it. Turns out it is way more of a pain than it should be- the existing sensors have to be driven out with a hammer and punch, completely obliterating them in the process. Then the new sensors have to be practically pressed (hammered) in- for me with the assistance of vise-grips as an on-the-car press. Along the way I figured it made sense to do the rear brakes 'cause it seems like I alwways have to and I had them all off anyway.
The front brakes _looked_ fine... but on inspection the rotors were too scored, even though I had plenty of pad left.. ah well, might as well refresh brakes all around.
Also the CV boot on the right side had a small hole in it and was throwing grease all around. I would have been happier not to have to remove the CV joint but I've done most of it enough times now that it wasn't too dramatic (once I had all of the parts which was a bit of a saga that I won't recount here). Most surprising is how the CV joint comes off the half-shaft with just a little spring clip.
Finally, not sure this would have been a failure point but I noticed my rear-most exhaust hanger was rusted out and broken. So I fabricated a new one- and for this I have photos!
I'm glad I got a TIG welder- much easier to make a decent weld on the car than using my acetelyne torch...Tuesday, March 23, 2021
Oil & filter change, Golf
247 k miles, time to change the oil and filter in the Golf. No pics, this is just an entry to log that it was done!
Final pieces off the block, crankshaft damage exposed!
Ok- this took a longer time to post than it took to actually do, sorry for any delay. All it really took was a couple of bolts to get the connecting rod cap off and I could see the damage to the crank. I have no experience assessing damage like this, but I can definitely tell that the crank journal (and maybe to a lesser extent the rod?) is scratched and not like the others.
Close up of the inside of the bearing cap. There was no bearing left in this one at all.
Shot number one of the crank journal for the rod- you can see and feel the scuffing.
Shot number two- hard to really do it justice with a photo- the difference in texture is really impressive.
I thought it worth including a shot of the connecting rods themselves, as there is a question of whether these are the "third gen" rods which were upgraded after these engines had been in production for a while. The previous owner's notes say the engine had been rebuilt, and there is an oil reservoir in the engine compartment that I hear is associated with that upgrade, but this shot should help figure it out. It's stamped Isuzu-FM-3234.
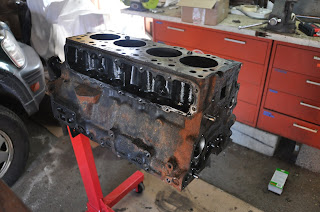
And finally, here is where we are now. Nothing left to remove! Now the block is light enough that I can haul it around by hand if need be. Next steps- take the block and crank to a machine shop for measurements, and to see what they think about this crank. The manual says that it shouldn't be ground because it is tuftrided, but I wonder if there's something we can do.


